Get that warm happy fuzzy feeling with these simply delicious recipes. Quick and easy, no mess no fuss! This is THE hug in a mug with a bit of a kick that you need this winter!
CARAMEL HOT TODDY
Hot Toddy is the perfect drink for cold winter nights and this recipe make its even more special !
INGREDIENTS
1/2c. caramel
1 slab caramel chocolate
2c. water
2 cinnamon sticks, plus more for garnish
1/3c. lemon juice
6oz. whiskey or bourbon
Lemon slices, for garnish
DIRECTIONS:
Step 1:Place crushed slab caramel on a shallow plate, and caramel on a separate shallow plate. Dip rims first in caramel, and then in crushed caramel slab.
Step 2: In a small saucepan over medium heat, combine water, crushed caramel slab, and cinnamon sticks. Stir constantly until chocolate is fully melted. Turn off heat and stir in lemon juice and whiskey.
Step 3:Ladle into mugs and serve.
HOT BUTTERED RUM IN SLOW COOKER RECIPE
A 50/50 mix of hot water and dark rum, a little butter, and a sprinkle of brown sugar, all spiced with cinnamon, nutmeg, cloves, and a pinch of salt. It’s smooth, sweet, and salty, with a slight bite from the rum.
INGREDIENTS
2 quarts water
1 (750 milliliter) bottle dark rum
2 cups brown sugar
¼ cup butter
3 cinnamon sticks
6 whole cloves
1 teaspoon salt
1 teaspoon ground nutmeg
DIRECTIONS
Combine water, rum, brown sugar, butter, cinnamon sticks, cloves, salt, and nutmeg in a slow cooker. Steep on Low until flavors combine, 2 to 6 hours.
CROCK POT RED WINE HOT COCOA
Red wine and hot chocolate might sound like a strange combination, but really, it works!
INGREDIENTS:
21/2c. semisweet chocolate chips
1/4c.cocoa powder
1/2c. granulated sugar
Pinch kosher salt
6c. whole milk1
Toasted marshmallows, for serving
Chocolate shavings, for serving
(750-ml.) bottle red wine
DIRECTIONS:
Combine chocolate chips, cocoa powder, sugar, salt, milk and wine in slow cooker. Cook on high for one hour, whisking every 20 minutes.
Ladle cocoa into mugs and top with toasted marshmallows and chocolate shavings.
DIRTY SNOWMEN
This one might be one of the most over-the-top, indulgent spiked hot cocoa recipes—ever.
INGREDIENTS:
1/4c. melted chocolate, for rim
1/2c. chocolate shavings
1 pint vanilla ice cream
2c. hot chocolate
1/2c. Baileys
Whipped cream, for serving
DIRECTIONS:
Step 1: Pour melted chocolate and chocolate shavings into separate shallow dishes. Dip rims of two mugs in melted chocolate then immediately dip in chocolate shavings.
Step 2: Using a medium cookie scoop, add a few scoops of ice cream into each mug. Pour hot chocolate and Baileys on top.
Step 3: Top with whipped cream and sprinkle with any extra chocolate shavings.
New York style. Neapolitan style. Sicilian style. If you’re a pizza lover, chances are you’re not just familiar with different variations, but you probably have strong opinions about most of them, too.
In 2025, it’s time to add a new pizza type to your repertoire: Say hello to pinsa.
While this style of pizza might be fairly new (and is slowly popping up on restaurant menus around the world) it’s actually been around since ancient Roman times. Back in the day, it was often made by people living in the countryside around the city. Some chefs say it predates all other styles of pizza due to its rustic style.
What Is Pinsa?
Pinsa comes from the Latin word “pinsere,” which means to press down with your fingers. Compared to pizza, pinsa crust is lighter and airier, like a cloud of dough. This is primarily due to the ingredients. Traditional pizza is made with flour, making it heavier and harder to digest. Pinsa uses a mixture of flours, including wheat, rice and spelt, along with more water and less salt.
Pinsa vs Pizza
To specify their main differences, we’ve broken them down for you:
Pinsa Differences
Made from all-purpose flour
Most commonly served in an oval shape
Fermentation for pinsa ranges from 48 to 72 hours
The dough uses more water than standard pizza dough
Thinner and lighter in texture
Pinsa dough is pressed and flattened by hand
Pizza Differences
Made from wheat flour
Circular in shape
Pizza dough ferments for a minimum of 24 hours
Contains more flour than pinsa dough
Variety of crust thicknesses
Pizza dough is tossed or thrown by hand
How to Make Pinsa Dough
Pinsa dough is not hard to make. As long as you have the right ingredients and follow the directions, you can cook up a delicious pinsa. To make the perfect pinsa dough, follow this recipe.
Pinsa Dough Recipe
3 1/2 cups of bread flour
1/2 cup of rice flour
1/2 Tbs. of active dry yeast
1 3/4 cup of cold water
1 tsp of salt
1 Tbs. of extra virgin olive oil
2 sheets of parchment paper
Directions
Mix both types of flour and yeast together in a large bowl.
Add in the cold water slowly while whisking it together with the flour.
Add in the olive oil and salt and mix together until there is no dry flour and the dough is smooth and elastic in texture.
Cover the bowl with plastic wrap or a lid and let it rest for 30 minutes.
After 30 minutes, mix for a final time, cover again, and let rest in the refrigerator for 24 hours.
After 24 hours, take the dough out on a powdered surface and split the large ball in half.
Shape each piece into two smaller balls and place them on parchment paper on their own baking sheets.
Dust the tops with a little flour and follow the pinsere method.
Using your fingers, begin to push the dough towards the sides of your baking sheet and make an oval shape with the dough.
Once flattened, use a basting brush and cover the dough in a light sheen of olive oil before arranging your desired toppings for baking.
And now the fun part ! Pinsa Toppings
When choosing the toppings for your pinsa, you can be as creative or as normal as you want! Whether you have picky eaters like children who might only like a cheese or pepperoni pinsa or their parents who have more experienced taste buds, you can craft a pinsa to please both. Try a margarita style or a more traditional cheese and mushroom pinsa called Pinsa Romana.
What we think
South African’s love pizza and this just happens to be a different version of an old favourite. There’s no such thing as bad pizza, and there is plenty of room for styles coming from different regions. So we think it’s a winner, something exciting, something different and just totally delicious. Try it !
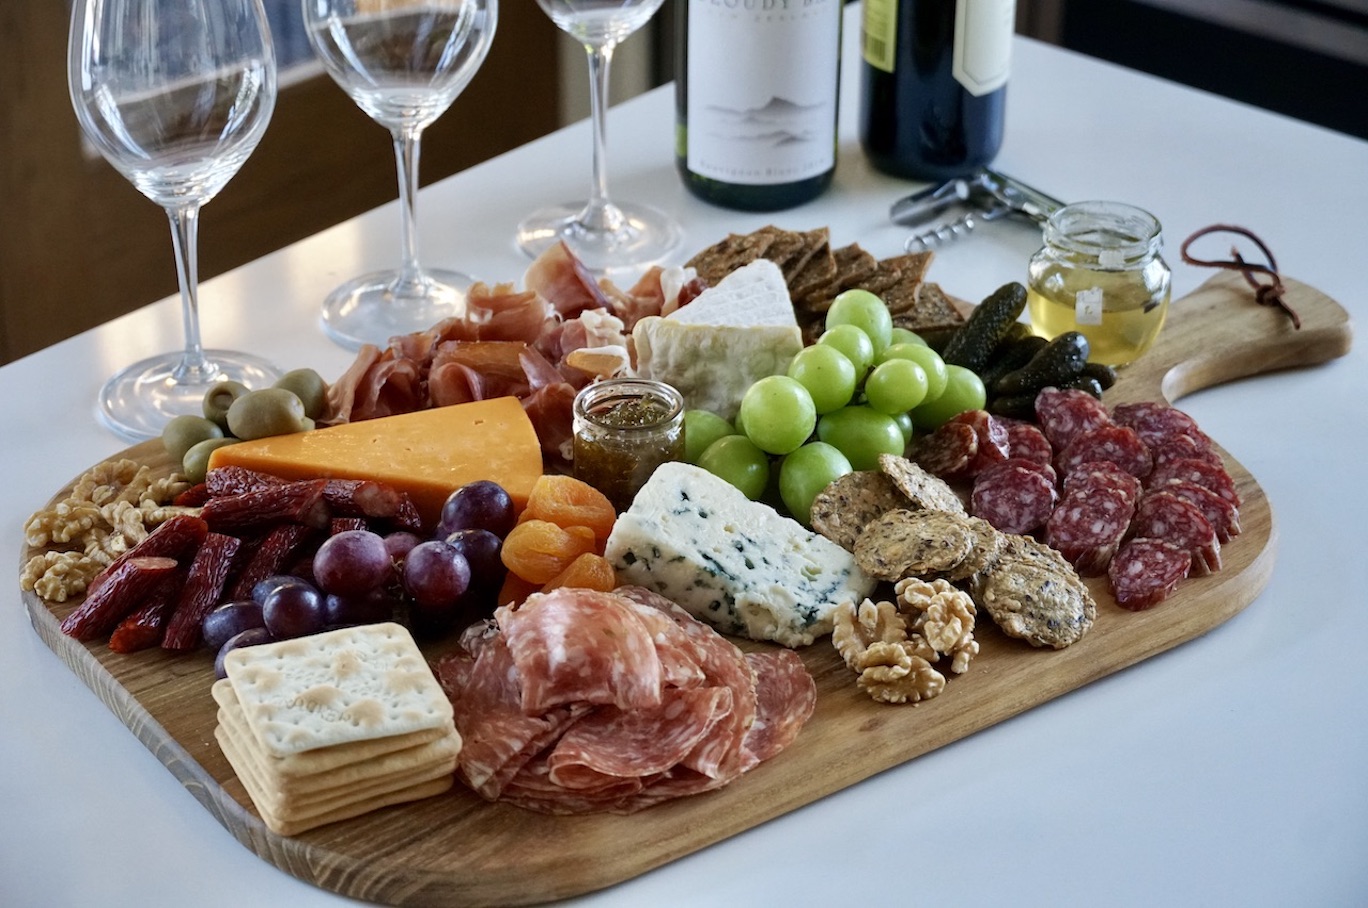
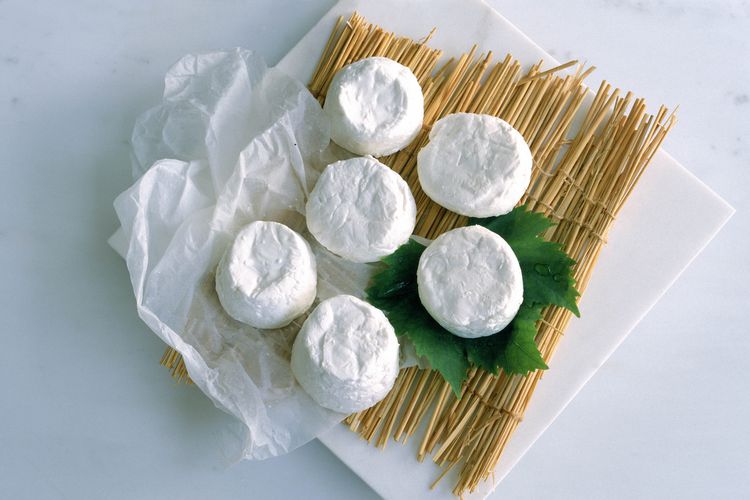
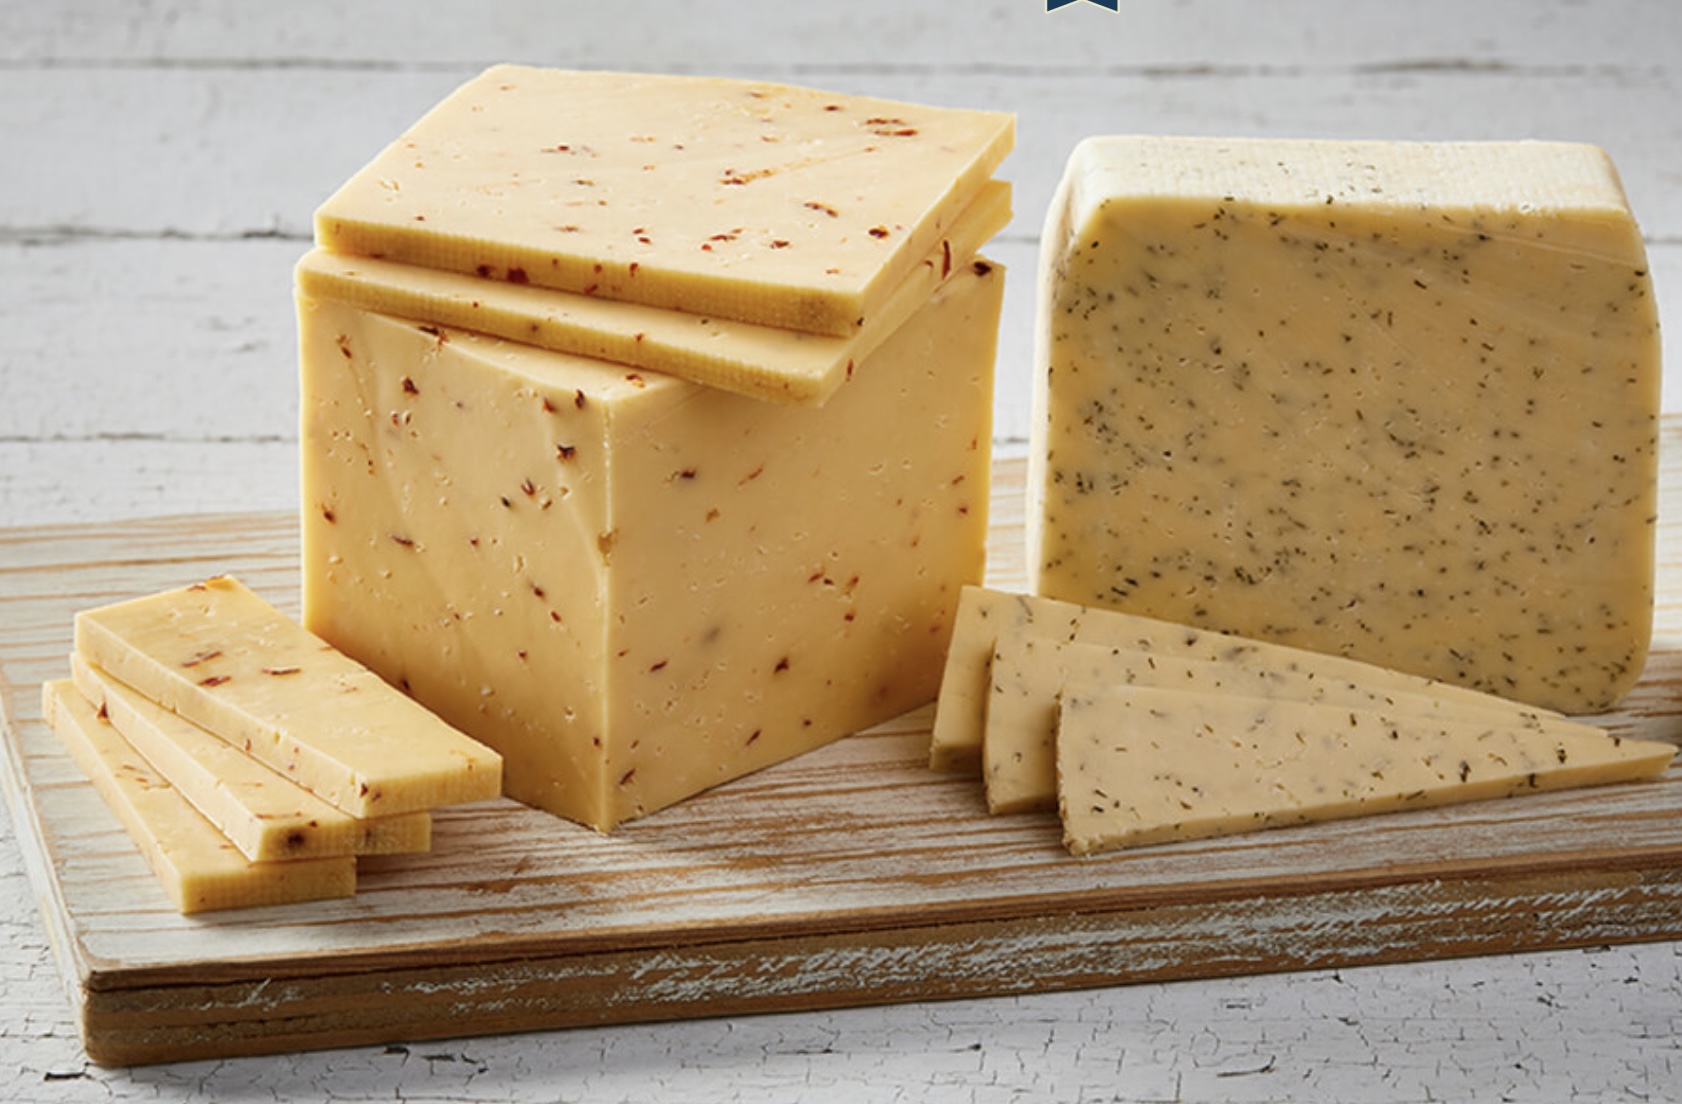
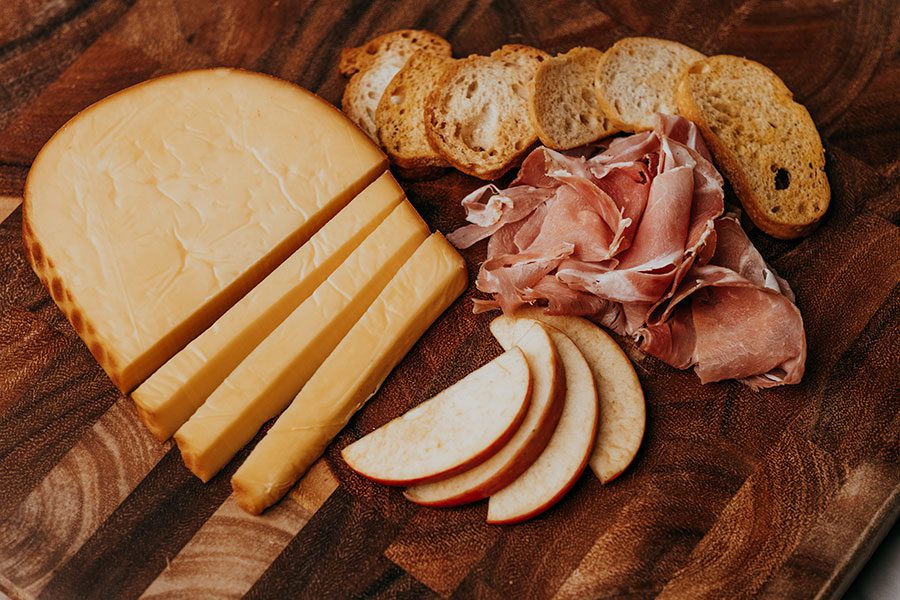
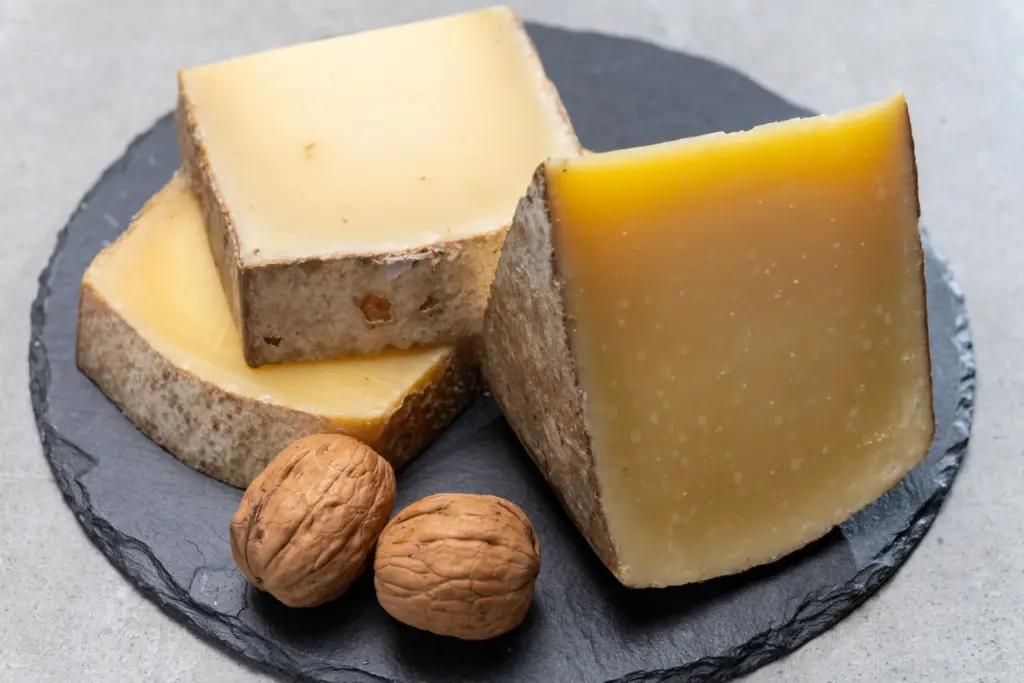
In 15th-century France, charcuterie referred to the art of preparing cured meats. Fast forward 600+ years and charcuterie has evolved into a catch-all phrase describing meats, cheeses, nuts, fruits, and spreads artfully decorated on a board. The cheese is often a favourite feature of a charcuterie board, elevating the flavour of the other ingredients. Customers are looking for a taste of luxury from their charcuterie board cheeses, but they also tend to favour the familiar. If you’re not sure which types of cheeses to include, we have you covered. Use these gourmet yet well-known luxury fromages as the foundation of your cheese board menu.
1. BURRATA
Burrata (pronounced br-aa-tuh) is a fresh cheese from Italy’s Puglia region. The traditional method of making Burrata involves stretching fresh mozzerella curds into a pouch-like shape, which is then filled with a mixture of cream and torn mozzarella pieces. The pouch is carefully sealed to create a smooth outer layer, resulting in a cheese that is both visually stunning and incredibly delicious. Burrata has a soft, silky exterior filled with a creamy and slightly stringy interior that oozes out when sliced open, adding a luxurious and indulgent element to any charcuterie board. It has a delicate and milky flavour that is complemented by a slight tanginess.
For optimal creaminess, let the burrata come to room temperature before serving. Cut into the cheese to reveal the velvety centre, and allow it to ooze onto the plate for a visually appealing presentation. Sprinkle sea salt and drizzle extra virgin olive oil over burrata to enhance its delicate flavours. It pairs beautifully with fresh fruits like figs, peaches, or cherries. Nuts such as walnuts or almonds provide a crunchy texture that complements the smoothness of burrata. For a more robust flavour profile, consider serving burrata with roasted vegetables like eggplant or zucchini. Crispy crostini is also an excellent choice. When selecting a wine to accompany burrata, opt for a light and crisp white wine such as Pinot Grigio or Sauvignon Blanc. If you prefer red wine, choose a light-bodied red like Pinot Noir or Beaujolais to complement the cheese’s creamy richness.
2. PARMESAN
Originating from Italy, Parmesan is a hard, granular cheese that is typically aged for 12 to 36 months. It is made from cow’s milk and has a pale yellow colour with a sharp, nutty taste.
To serve Parmesan on your charcuterie board, it is best to cut it into small wedges or cubes to make it easy for guests to enjoy. You can also shave or grate Parmesan over other foods to add a burst of flavour. Serve Parmesan at room temperature to allow its flavours to fully develop and provide the best tasting experience for your guests. It complements cured meats like prosciutto di Parma and salami, as well as fruits such as grapes, pears, strawberries, and apples. Parmesan also pairs nicely with honey, balsamic vinegar, and olives, adding depth and complexity to your charcuterie board. For wine pairings, Parmesan cheese complements medium to full-bodied wines such as Chianti, Merlot, and Cabernet Sauvignon. These wines help balance the sharpness of the cheese and enhance its flavours, creating a harmonious tasting experience.
3. GRUYERE
Originating from the Gruyeres (groo-yehr) district in Switzerland, gruyere is an Alpine-style semi-hard cow’s milk cheese. Made from raw cow’s milk, gruyere is aged for a minimum of five months, developing its signature nutty and slightly funky flavour profile. During the aging process, the cheese is regularly turned and brushed with a saltwater brine, contributing to its unique texture, taste, and funky smell. As a type of “stinky cheese”, gruyere emits a strong, earthy scent, but don’t let its pungent aroma fool you. The flavour of gruyere combines nutty, savoury, and slightly sweet notes with a hint of earthiness. Its firm, dense, and granular consistency makes slicing and grating easy.
Gruyere is an excellent melting cheese, making it a classic choice for quiches, so consider adding mini gruyere quiches to your breakfast board. On a traditional charcuterie board, baked gruyere in puff pastry is a more complex alternative to baked Brie. The cheese’s savoury flavour contrasts well with fruits such as apples, pears, and dried apricots. Walnuts, hazelnuts, and almonds bring out the nutty notes of gruyere. Crusty bread or cured meats like bundnerfleisch (air-dried Swiss beef), speck, and salami are also excellent pairing choices. Its rich flavour profile pairs well with white wines such as Chardonnay or Sauvignon Blanc, as well as red wines like Pinot Noir or Merlot. The acidity and fruitiness of these wines enhance the flavours of the cheese, creating a delightful sensory experience for those enjoying a charcuterie board featuring gruyere.
4. BRIE
Originating from the Ile-de-France, Brie is a soft cow’s milk cheese with a bloomy rind. Brie (pronounced bree) has a smooth and creamy texture with a slightly firm outer layer that gives way to a gooey interior as it ripens. It’s known for its rich, buttery taste underscored by umami and mushroom notes. When serving Brie, a cheese knife with a thin blade and a sharp edge helps cut through the soft interior and rind without squishing the cheese. A cheese knife with a forked tip is also helpful for serving individual portions of Brie with ease. To achieve the ideal serving temperature, remove the cheese from the refrigerator at least 30 minutes before serving so it softens and reaches its peak flavour profile.
The creamy texture and mild flavour of Brie make it a crowd-pleaser that complements both savoury and sweet components on a charcuterie board. Try drizzling hot honey over the Brie for a swicy complement to its creamy, mild flavour. Fruit preserves such as fig jam or apple butter are also excellent Brie enhancers, especially when scooped on a baguette slice or crunchy crackers. You can also serve it alongside fresh fruits like apples, grapes, pears, and berries. For savoury accompaniments, classic cured meats like prosciutto or salami work wonderfully, as do briny olive varieties such as kalamata, Castelvetrano, or picholine.
5. MANCHEGO
Originating from the La Mancha region of Spain, mancheg is made from sheep’s milk and has a distinct flavour and texture. To make Manchego, the milk is curdled using animal rennet and then pressed into moulds to form its characteristic cylindrical shape. The cheese is then aged for a minimum of 60 days, with some varieties aging for up to two years, resulting in different flavour profiles. In general, manchego is known for its nutty and slightly tangy flavour, with hints of grassiness from the sheep’s milk. Its high butterfat content (nearly double that of cow’s milk cheese) creates a creaminess that balances its bold flavour. Its texture is firm and slightly crumbly, making it easy to slice and serve on a charcuterie board.
Manchego (pronounced man-chay-gow) requires a cheese knife with a sharp blade to cut through its firm texture. It should be served at room temperature to allow its flavours to develop. Manchego’s robust taste can stand up to other bold flavours, making it a versatile cheese for pairing. Spicy meats and cured ham varieties such as jamon Iberico, chorizo, sopressata, and Serrano ham are all excellent meat pairing choices on a charcuterie board. Other Spanish tapas favourites like marcona almonds, olives, croquettes, patatas bravas, and pan con tomatoes create an authentic Spanish charcuterie board. For wine pairings, manchego complements Spanish wines such as Tempranillo or Rioja, as well as white wines like Albarino or Verdejo.
6. CHEVRE
Chevre (pronounced SHEV-ruh)) is a type of goat cheese that adds a unique touch to any charcuterie board. Originating from France, chevre has gained worldwide recognition for its unique flavour profile and creamy texture. Containing less lactose than cow’s milk cheese, chevre can be a good option for those with lactose sensitivities, but not for those with a dairy allergy. To make chevre, fresh goat’s milk is curdled and drained, resulting in a soft and spreadable cheese. It’s then aged for a short period, typically a few days to a few weeks, to develop its distinct, tangy flavour. Chevre can also be flavoured with herbs, spices, or fruits for additional depth.
For serving chevre, a cheese knife with a narrow blade and a sharp point allows for precise slicing, maintaining the integrity of the cheese’s texture. Chevre has a tangy and slightly acidic flavour with earthy undertones, offering a refreshing addition to a charcuterie board. Its creamy, smooth texture is easy to spread on crackers or bread. Chevre pairs well with a variety of foods, including honey, figs, olives, and various nuts, adding a burst of flavour to each bite. When it comes to wine pairings, chevre complements crisp white wines such as Sauvignon Blanc or Pinot Grigio. The acidity of these wines balances the tanginess of the cheese, creating a harmonious combination for your palate.
7. HAVARTI
Havarti is a semi-soft cow’s milk cheese that originated in Denmark. This creamy cheese (pronounced huh-vaar-tee) is named after the Havarthigaard farm, where it was first crafted in the mid-19th century. It’s known for its smooth, buttery texture and mild, slightly tangy flavour. To make Havarti, fresh cow’s milk is pasteurized and then mixed with a starter culture and rennet to begin the cheese-making process. The cheese curds are cut, drained, and pressed into moulds before being aged for several months.
Havarti’s mild and slightly tangy flavour makes it a popular choice for charcuterie boards, where it can complement a variety of meats, fruits, and nuts. The buttery texture of Havarti also makes it easy to spread on crackers or bread; consider adding some honey or fruit preserves to complement its mild flavour profile. Havarti pairs nicely with crisp, acidic, and light-bodied white wines such as Chardonnay or Sauvignon Blanc. Its mild, buttery flavor complements dessert wines such as Moscato, late-harvest Riesling, or a fortified wine like port. To serve Havarti, it is best to use a cheese knife with a thin blade and a sharp edge. This type of knife creates clean cuts through the cheese without causing it to crumble or stick to the blade.
8. SMOKED GOUDA
Originating from the Netherlands, Gouda Cheese (pronounced goo-duh) is typically made from cow’s milk and comes in various forms, including the smoked variety. To create smoked Gouda, the cheese is first aged to develop its characteristic flavour and texture. It is then cold-smoked and exposed to vapor from wood chips or other sources. This smoking process imparts a rich flavour to the cheese, enhancing its overall taste. Smoked Gouda is semi-soft and smooth, making it easy to slice or cube for serving on a charcuterie board.
Smoked Gouda is prized for its creamy, slightly sweet taste with a subtle smokiness that sets it apart from traditional Gouda cheese. Its flavour profile makes it a versatile option for pairing with cured meats such as prosciutto or salami, as well as fruits like apples or pears for a well-rounded charcuterie board experience. For wine pairings, consider serving smoked Gouda with a medium-bodied red wine such as Merlot or a crisp white wine like Chardonnay; because their fruity and acidic notes enhance the rich, smoky flavours of the cheese. To serve smoked Gouda on your charcuterie board, consider using a cheese fork. This specialized utensil is designed with sharp prongs to easily pick up and serve cheese without altering its shape or texture.
9. COMTE
Comte (pronounced kaam-tee) is a French cheese from the Franche-Comte region in eastern France. This semi-hard cheese is made from unpasteurized cow’s milk and boasts a rich history dating back to the 12th century. It’s produced in cooperatives known as fruitieres where local dairy farmers bring their milk to be transformed into this delectable cheese. To craft Comte, the milk is heated and curdled before being pressed into large wheels and aged for a minimum of four months to several years. The extended aging process contributes to Comte’s complex taste and distinctive texture. Comte is firm yet supple with a smooth, creamy mouthfeel. Its flavour profile ranges from savoury to slightly sweet, with a lingering nuttiness that adds depth to any dish.
Thanks to its nutty flavour, Comte pairs well with almonds, pistachios, and cashews. It complements salty cured meats like pancetta, soppressata, and salami. Take a sweet turn and try pairing Comte with dark chocolate, candied nuts, or chutneys. To properly serve and enjoy Comte, it is recommended to use a hard cheese knife with a sharp blade and a sturdy handle. This type of knife allows for clean cuts through the firm texture of the cheese, ensuring a perfect presentation on your charcuterie board. When selecting a type of wine to pair with Comte, opt for a medium to full-bodied wine such as Chardonnay, Pinot Noir, or Beaujolais to complement the cheese’s flavours without overpowering them.
10. MIMOLETTE
Originating from France, specifically the northern regions of Normandy and Picardy, Mimolette is known for its distinctive orange hue and complex flavour profile. This cheese (pronounced mee-moh-lett) is made from cow’s milk and undergoes a meticulous aging process that can last up to 24 months. During this time, the cheese develops a hard, crumbly texture with small crystals that add a delightful crunch to each bite. Mimolete’s rich and nutty taste with hints of caramel and butterscotch make it a versatile option for charcuterie boards.
For its flavours to fully bloom, Mimolette is best served at room temperature. Use a sturdy cheese knife with a sharp edge to cut through its firm texture. It pairs well with dried fruits, nuts, and crusty bread. For a truly decadent appetizer pairing, slather a crostini with Pistacchiosa and a slice of Mimolette. Pistacchiosa is a sweet spread made with Sicilian pistachios, sugar, and extra virgin olive oil. For wine pairings, Mimolette complements both red and white wines. Choose a bold red wine like Cabernet Sauvignon or Bordeaux. Sparkling white wines like champagne can also enhance Mimolette’s flavour.
CHEESE BOARD TIPS
When preparing a charcuterie board, it is essential to pay attention to the cheese selection and presentation. Follow these cheese board tips to ensure you have the ideal serving sizes, preparations, and presentations for your guests.
Serve Cheeses at Room Temperature: To fully appreciate the flavours and textures of the cheeses, it is recommended to serve them at room temperature. Take the cheeses out of the refrigerator about 30 minutes to an hour before serving to allow them to soften and develop their full flavour profiles.
Standard Serving of Cheese per Person: When planning the quantities of cheese for your charcuterie board, a standard serving size is approximately 2 to 3 ounces of cheese per person. This amount allows guests to sample a variety of cheeses without overwhelming their palates. Consider offering a selection of cheeses with different flavours and textures to cater to various preferences.
Presentation: Arrange the cheeses on the board in an aesthetically pleasing way. Consider different shapes and sizes for visual appeal. Labelling the cheeses can also be helpful for guests who may not be familiar with the varieties.
3-3-3-3 Rule: The 3-3-3-3 Rule is a formula for making the perfect charcuterie board. To achieve a 3-3-3-3 board, include 3 cheeses, 3 meats, 3 starches (crackers, breads, pretzels), and 3 accompaniments (fruit, dips, nuts).
In a professional kitchen, the hierarchy of chefs is essential for maintaining organization, discipline, and efficiency. This structured system, known as the brigade de cuisine, was developed by Auguste Escoffier in the late 19th century and remains a cornerstone of modern kitchens. Here are the 10 top types of chefs, organized by rank and responsibility:
1. Executive Chef (Chef de Cuisine)
The executive chef is the highest-ranking individual in the kitchen. Responsible for the overall management of the kitchen, this chef designs the menu, manages budgets, oversees food quality, and ensures smooth kitchen operations. In large establishments, the executive chef may rarely cook and instead focus on administrative and supervisory duties.
2. Sous Chef (Deputy Chef)
Directly beneath the executive chef, the sous chef acts as the second-in-command. They oversee day-to-day operations, coordinate kitchen staff, and step in during the absence of the executive chef. A good sous chef must be highly skilled, organized, and able to handle pressure.
3. Chef de Partie (Station Chef)
The chef de partie manages a specific section of the kitchen. Depending on the size of the restaurant, there may be several chefs de partie, each specializing in a particular type of dish or technique. They are experts in their area and ensure their team delivers consistent, high-quality dishes.
4. Saucier (Sauce Chef)
The saucier is in charge of making sauces, soups, and stews. This role is considered one of the most prestigious among station chefs due to the complexity and importance of sauces in fine dining. In smaller kitchens, this role may be combined with others.
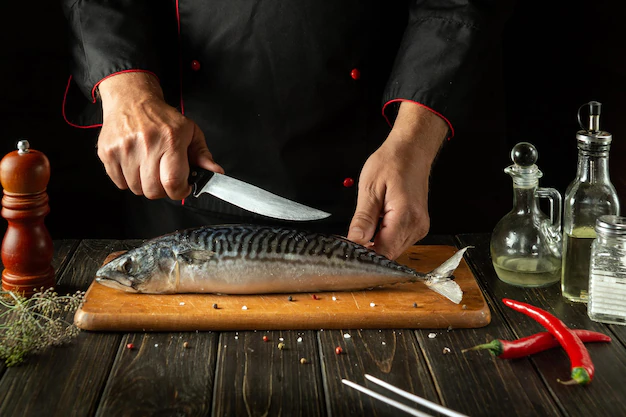
5. Poissonnier (Fish Chef)
This chef specializes in preparing and cooking fish and seafood. The poissonnier must understand the nuances of different types of fish, including how to clean, fillet, and cook them to perfection.
6. Rôtisseur (Roast Chef)
The rôtisseur handles roasted, grilled, and braised meats. They are responsible for meat preparation, including marinating and slow-cooking processes. In some kitchens, they may also oversee carving and plating meat dishes.
7. Garde Manger (Pantry Chef)
This chef manages cold dishes such as salads, pâtés, terrines, and cold appetizers. In high-end kitchens, the garde manger may also be responsible for decorative platters and presentations for buffets or banquets.
8. Pâtissier (Pastry Chef)
The pâtissier specializes in baked goods, pastries, and desserts. This role requires precision, creativity, and knowledge of baking techniques. In large establishments, pastry chefs may lead a team of bakers and confectioners.
9. Tournant (Relief Chef or Roundsman)
The tournant is a versatile chef who fills in wherever needed. They must be proficient in all stations and capable of stepping into any role to ensure operations continue smoothly, especially during staff shortages.
10. Commis Chef (Junior Chef)
Commis chefs are entry-level cooks working under the chef de partie. They assist with basic tasks such as chopping, prepping ingredients, and maintaining cleanliness. This role is an essential training position for those starting their culinary careers.
This hierarchy allows professional kitchens to function efficiently, ensuring each role supports the others while maintaining high standards of food quality and service.
Hot toddies bring warmth and cheer, making them a fun favourite during cold seasons. They’re perfect for cozy gatherings and around a fire. Crafting a hot toddy feels like a mini ritual—steamy mug in hand, comforting aromas rising. It’s also fun to serve guests a drink that feels both luxurious and homemade. Whether for relaxation or socializing, a hot toddy turns any chilly evening into a cozy celebration.
We’ve rounded up 3 of the best recipes…
Lemon Hot Toddy
If you have bourbon, honey, lemon, and hot water, you can have a superlative toddy in just a few minutes. This classic hot toddy is the perfect winter drink to make at home, even when your bar collection is spare. A mix of boiling water, whiskey, honey, and lemon juice, it’s a cozy way to warm up on a cold night.
INGREDIENTS:
2 Shots whiskey or bourbon Get some pretty good quality. You’re sick! You deserve the best!
1½ tablespoons honey
4 shots water
2 teaspoons lemon juice
1 cube crystallised ginger optional
1 slice fresh lemon for garnish
DIRECTIONS:
Mix together whiskey, water, and lemon juice in a microwave-safe bowl. Microwave for 1 minute, or until it’s piping hot. Stir in the honey, and drop in the ginger if using. Garnish with a lemon slice and enjoy–you and your cold deserve it!
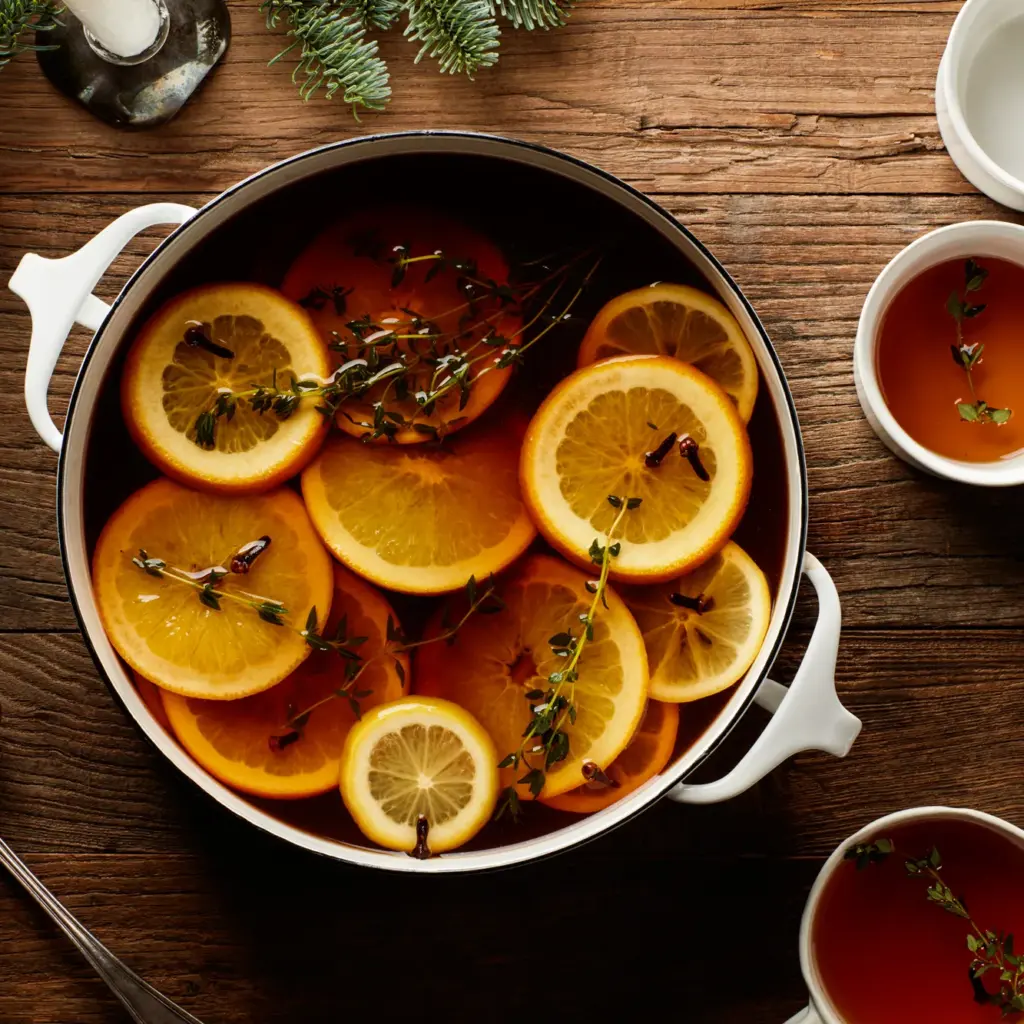
Raspberry and Thyme Hot Toddy Punch
A crowd pleaser! Serve this deliciously warming hot toddy punch to welcome guests in from the cold or along with dessert at the end of big hearty meal.
INGREDIENTS:
4 black tea bags, preferably English Breakfast
1 lemon, thinly sliced
1 orange, thinly sliced
1/4 cup sugar
1 tablespoon cloves
12 sprigs thyme; plus more for serving (optional)
1 1/2 cups raspberry liqueur, such as Chambord
1 1/2 cups whiskey, preferably rye
1/4 cup fresh lemon juice
DIRECTIONS:
Bring 10 cups water to a boil in a large pot. Reduce heat and bring to a simmer. Add tea bags, lemon and orange slices, sugar, cloves, and 12 thyme sprigs; simmer, covered, 10 minutes. Remove from heat; discard tea bags. Stir in raspberry liqueur, whiskey, and lemon juice. Divide among mugs and garnish with thyme sprigs, if desired.
Maple Syrup Hot Toddy
For this classic cocktail, you’ll just need hot water, whiskey, maple syrup, and lemon. It’s light and hydrating rather than overwhelmingly sweet.
INGREDIENTS:
2 Shotes Whisky
1 Shot Lemon juice
Maple syrup
4 Shots Hot water
2 Lemon wedges
1 Cinnamon stick
Star anis
DIRECTIONS:
In a mug, stir together the hot water, whiskey, lemon juice, and syrup until the syrup dissolves. Taste and adjust as desired. Garnish with the …
Pairing food and wine is both an art and a science. While there are no strict rules, certain guidelines can elevate the dining experience by enhancing flavors, balancing tastes, and creating harmony between the dish and the drink. Here are some key tips for successful food and wine pairing:
1. Balance the Weight
One of the most important principles is matching the weight or body of the wine with the weight of the food. A rich, heavy dish like beef stew pairs best with a full-bodied wine like Cabernet Sauvignon or Syrah. In contrast, lighter dishes such as grilled fish or a fresh salad are better complemented by light-bodied wines like Sauvignon Blanc or Pinot Grigio. The idea is to ensure one doesn’t overpower the other.
2. Match Acidity
Acidic foods need acidic wines. For example, tomato-based dishes pair wonderfully with wines that have bright acidity, such as Chianti or a dry Riesling. If a wine is too soft in acidity and the food is very tangy, the wine can taste dull or even flabby. On the other hand, an acidic wine can bring out freshness in a rich or creamy dish, acting like a palate cleanser.
3. Complement or Contrast Flavors
You can either complement flavors in the food and wine or contrast them for a more dynamic experience. A classic complementary pairing is a buttery Chardonnay with a creamy pasta dish—both share rich, smooth textures. For contrast, consider a spicy Asian dish with a slightly sweet wine like Gewürztraminer or an off-dry Riesling; the sweetness balances the heat and enhances the overall flavor.
4. Consider the Sauce
When pairing wine, it’s often more important to focus on the sauce than the protein. Chicken in a rich mushroom cream sauce calls for a very different wine than grilled chicken with lemon and herbs. The first might match well with a barrel-aged Chardonnay, while the second is better suited to a crisp Sauvignon Blanc.
5. Tannins and Proteins
Tannins, found in red wines like Cabernet Sauvignon, Malbec, and Nebbiolo, bind with proteins and fats, softening their bitterness and bringing out the wine’s fruit character. This is why tannic reds work so well with steaks or lamb. However, if the dish is low in fat, like grilled vegetables or fish, high-tannin wines can feel harsh or drying.
6. Sweetness and Spice
When it comes to spicy foods, off-dry (slightly sweet) wines are a smart choice. The sweetness can tame the heat and prevent the alcohol from intensifying the spice. This makes wines like Moscato or off-dry Rieslings excellent with Thai or Indian dishes.
7. Match Intensity
Delicate dishes work best with subtle wines, while robust foods demand bold wines. A seared tuna steak might shine with a light Pinot Noir, while a hearty lasagna stands up to the richness of a Zinfandel.
8. Experiment and Have Fun
While guidelines help, personal preference should always be the final judge. Wine and food pairing is subjective, and exploring different combinations can lead to delightful surprises. Hosting a tasting with small plates and a variety of wines is a great way to discover new favorites.
Ultimately, the best pairings are those that enhance both the wine and the dish, creating a cohesive and enjoyable experience.
Kick off Father’s Day with a breakfast that Dad will love. Whether you’re having an early bird breakfast for an activity-filled day ahead or a laid-back brunch, you can’t go wrong with these Father’s Day breakfast ideas. No matter what you choose to make, you can be sure he will enjoy it because it was made with love!
Try these delicious Recipes
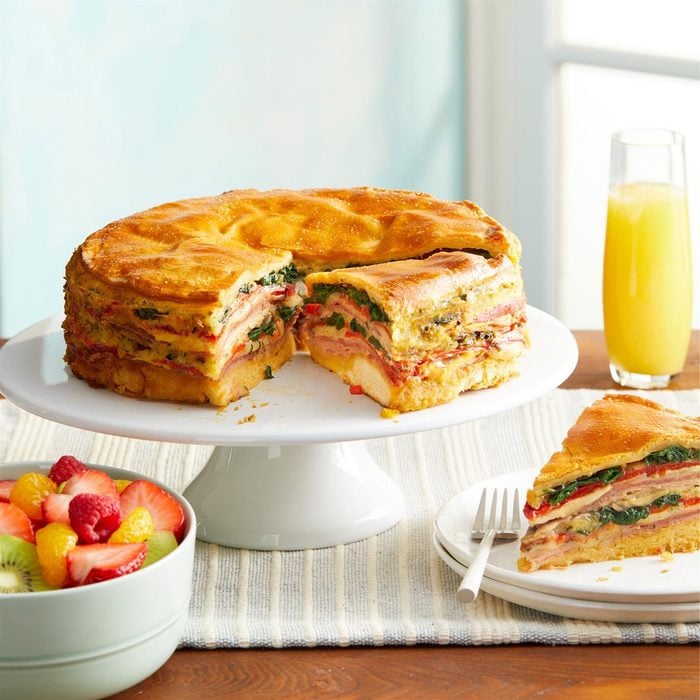
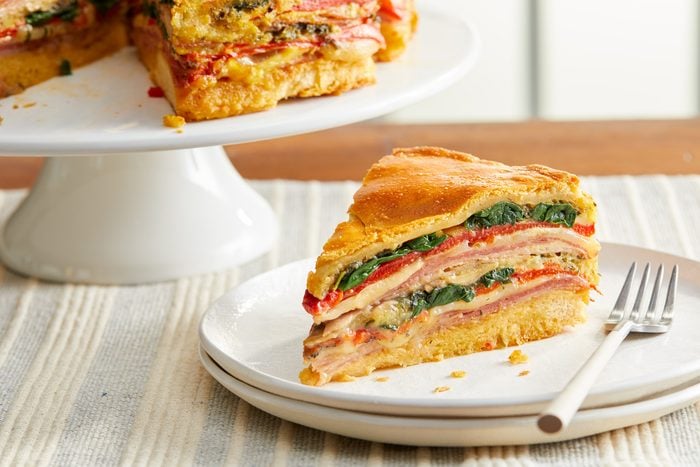
Italian Brunch Torte
This torte makes a statement! Piled high with eggs, salami, deli ham, provolone, spinach, mushrooms and roasted sweet red peppers, it’s encased in crescent roll dough and baked for a little over an hour. Make sure you have a sharp, long chef’s knife to cut all the way through all those layers!
Ingredients for Italian Brunch Torte
Refrigerated crescent rolls: Instead of shaping the dough into individual rolls, you’ll press the dough together in flat layers to form the torte’s bottom and top crusts.
Spinach and mushrooms: Baby spinach and sliced mushrooms are cooked in a touch of olive oil to create a veggie layer that lightens the hearty meat and cheese layers. White button and cremini mushrooms are good options.
Egg filling: Beating eggs with grated Parmesan cheese, Italian seasoning and pepper ensures that every bite of this Italian torta is flavourful.
Deli ham: You will layer the deli ham with other meats and cheeses, so it’s best to opt for thinly sliced deli ham rather than a thicker-cut spiral ham.
Hard salami: Hard salami has a bolder flavor than Genoa salami, making it the better choice for this multi-layered recipe. If you get it from a deli counter, ask for thin slices that have a similar width to the ham.
Provolone cheese: Salty and slightly tangy, sliced provolone cheese adds flavor and a creamy, melty factor. You could substitute sliced mozzarella but not fresh mozzarella—fresh has too much water for this Italian torta recipe.
Roasted sweet red peppers: Jarred roasted red peppers are best.
Directions
Step 1: Bake the Crust. Place a greased springform pan on a double thickness of heavy-duty foil. Securely wrap the foil around the pan. Unroll one tube crescent dough and separate it into triangles.
Step 2: Prepare the Spinach Mixture. While the crust bakes, in a large skillet, heat the oil over medium-high heat. Add the spinach and mushrooms. Cook and stir until the mushrooms are tender. Drain on several layers of paper towels, blotting well.
Step 3: Whisk the Egg Mixture. In a large bowl, whisk six of the eggs with the Parmesan cheese, Italian seasoning and pepper.
Step 4: Assemble the Italian Torte. Layer the crust with half the ham, salami and provolone cheese. Add half the red peppers and the spinach mixture. Pour half the egg mixture over top. Repeat the layers. Top with the remaining egg mixture.
Step 6: Add the Top Crust. On a work surface, unroll and separate the remaining crescent dough into triangles. Press them together to form a circle and seal the seams. Place the dough over the filling. Whisk the remaining egg and brush it over top of the dough.
Step 5: Bake the Italian Torte. Bake, uncovered for 1 hour to 1 hour and 15 minutes, covering the pan loosely with foil if needed to prevent overbrowning. Carefully loosen the sides from the pan with a knife, then remove the rim from the pan. Let stand for 20 minutes.
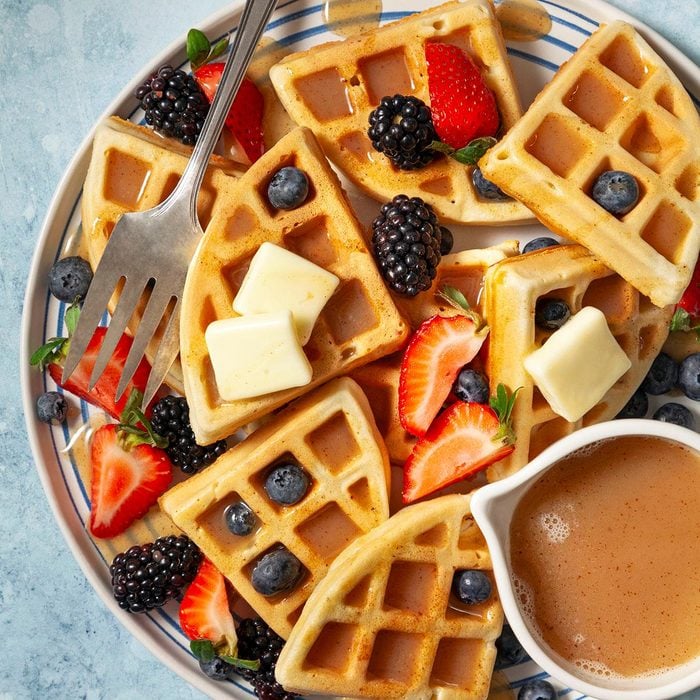
Gourmet Waffles
This is a classic, just like Dad. Even though waffle makers are a one-trick pony, they prove their worth every time we get to pull out crispy, golden waffles and then douse them in our favorite toppings.
Ingredients for Waffles
All-purpose flour: We want these waffles to come out perfectly: not too dense but not too flimsy.
Sugar: You’ll need only 1 tablespoon granulated sugar for this waffle recipe. It’s just enough to help the waffles brown and crisp up without making them sweet.
Baking powder: Thanks to baking powder and egg whites as leavening agents, these waffles become gorgeously fluffy once they’re baked.
Eggs: All three eggs will need to have their whites separated from the yolks.
Milk: We prefer to use 2% milk in these waffles, but you can swap in whole milk, heavy cream or buttercream instead.
Canola oil: We add richness to this waffle recipe with canola oil, but you can use melted butter if you prefer.
Cinnamon cream syrup: We absolutely love pouring this cozy cinnamon cream syrup all over waffle recipes. All you need to do is boil evaporated milk, light corn syrup, a bit of sugar, cinnamon, vanilla and water until it’s thickened.
Directions
Step 1: Make the batter. In a bowl, whisk together the flour, sugar, baking powder and salt. In a separate bowl, whisk together the egg yolks, milk and canola oil. Stir the wet ingredients into the dry ingredients just until moistened.
Step 2: Fold in the Egg Whites. In a small bowl, use a hand mixer with clean beaters to beat the egg whites until stiff peaks form. Gently fold the egg whites into the batter just until no white streaks remain. Don’t overdo it or you’ll knock out too much air.
Step 3: Bake the waffles. Now it’s time to break out your best waffle maker. Thoroughly preheat it so the waffles can begin to crisp as soon as the batter touches the pan. Bake the waffles in the waffle maker according to the manufacturer’s directions.
Step 4: Finnish with Cinnamon syrup. While the waffles are baking, make the cinnamon cream syrup by combining the sugar, corn syrup and water in a saucepan. Bring the mixture to a boil over medium heat, and cook and stir until thickened, about two minutes. Remove the saucepan from the heat, then stir in the milk, vanilla and cinnamon.
Serve the warm cinnamon cream syrup with the warm waffles. Scatter fresh berries all over if desired.
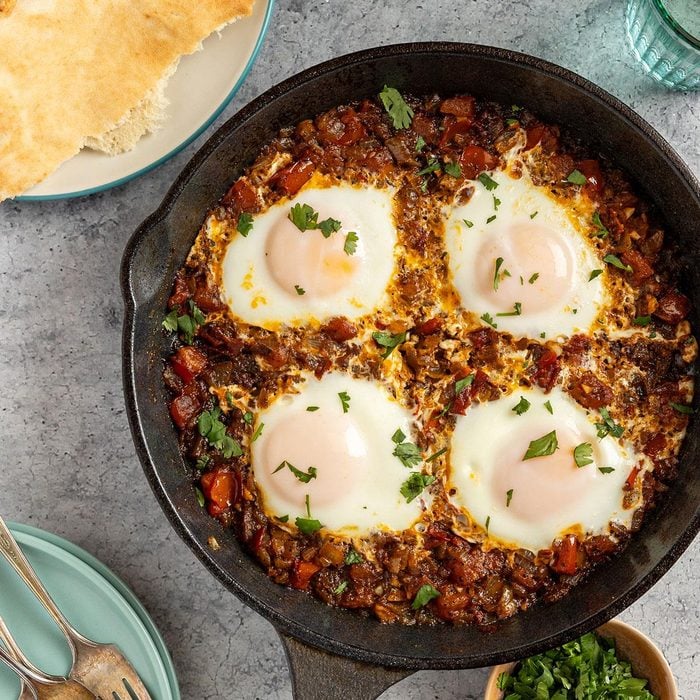
Shakshuka
Shakshuka is a vibrant egg dish that originated in North Africa and was popularized in the Middle East. This one skillet meal features poached egg atop a savoury tomato sauce seasoned with spices. It’s a comforting and nutritious breakfast or brunch option, perfect for a cozy weekend at home.
Ingredients for the Shakshuka
Olive oil: Olive oil provides a rich and smooth texture when sauteing the vegetables. It also adds a subtle flavour that enhances the overall taste of the shakshuka.
Onion and garlic: Chopped onions and minced garlic add a savoury aroma and flavour to the sauce and become tender and slightly caramelized when sauteed.
Cumin and chili powder: Ground cumin introduces a warm, earthy flavor characteristic of Middle Eastern cuisine. It complements the tomatoes and enhances the overall seasoning of the dish. Chili powder brings a subtle kick of heat.
Pepper and salt: Black pepper adds mild heat and spice to the shakshuka, while salt enhances each ingredient, making them taste more pronounced.
Sriracha: For those who enjoy a spicier kick, hot pepper sauce adds extra heat and flavour.
Tomatoes: Chopped fresh tomatoes are the star of the sauce, providing a juicy and slightly tangy base. They break down while cooking to create a rich and flavourful sauce.
Eggs: Eggs are poached directly in the tomato sauce. The runny yolks mix with the sauce, creating a luscious texture.
Cilantro: Cilantro adds a fresh and herbaceous note. It’s sprinkled on top before serving for a burst of color and flavour.
Pita: Toasted pita bread is the perfect accompaniment for scooping up the flavourful sauce and runny egg yolks.
Directions
Step 1: Make the Sauce. Heat oil over medium heat in a large cast-iron or other heavy skillet. Add the onion and cook until tender, about four to six minutes. Add garlic, seasonings and chili sauce, if you desire some heat. Cook for 30 seconds, add tomatoes and keep cooking until the mixture is thick, three to five minutes.
Step 2: Poach the Eggs. Make four wells in the vegetable mixture with the back of a spoon. Break one egg into each well, cover the pan and cook until the egg whites are completely set and the yolks begin to thicken but are not hard, about four to six minutes. Sprinkle with cilantro and serve with pita bread.
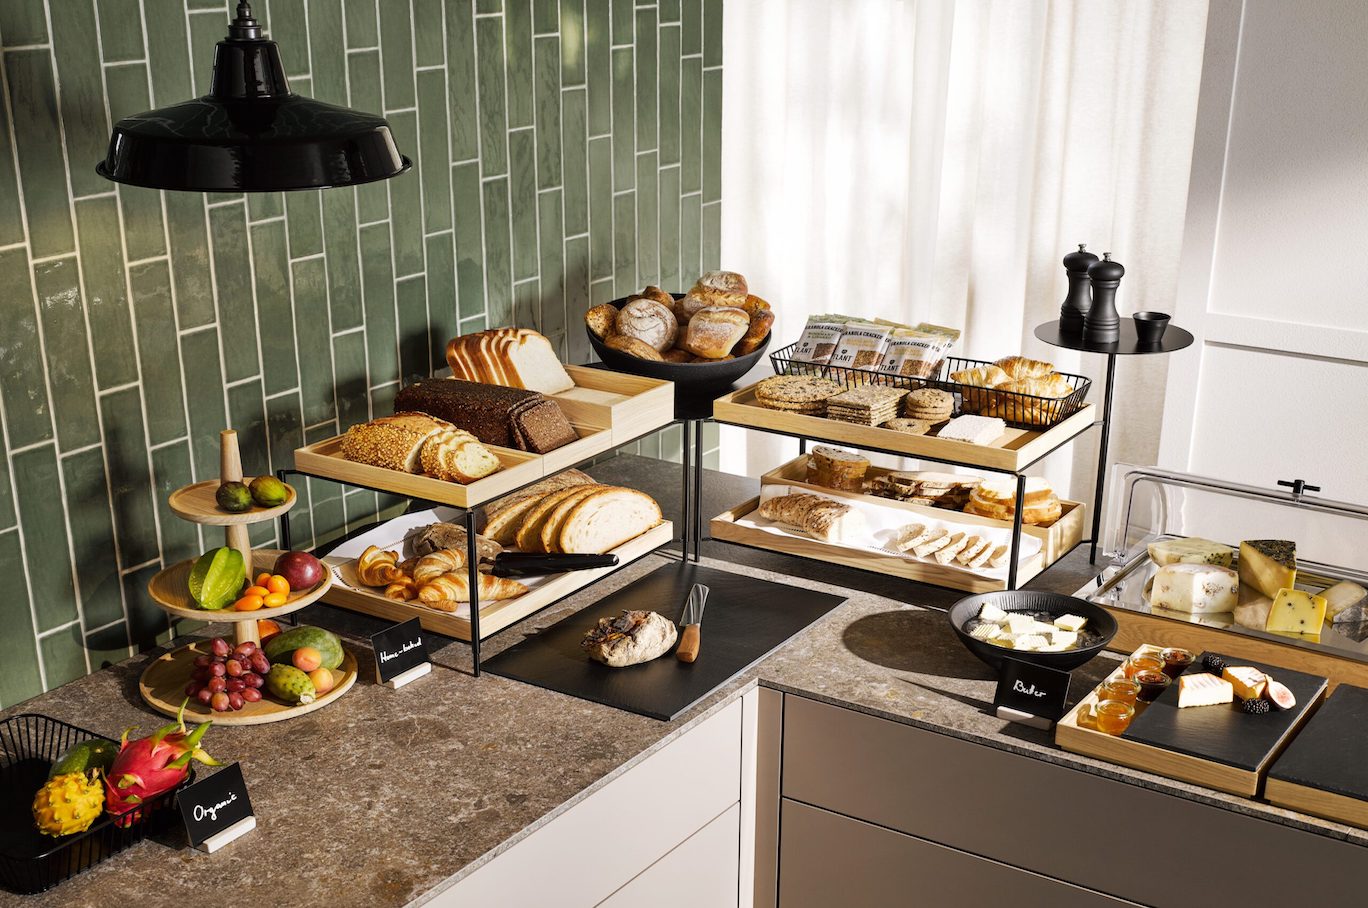
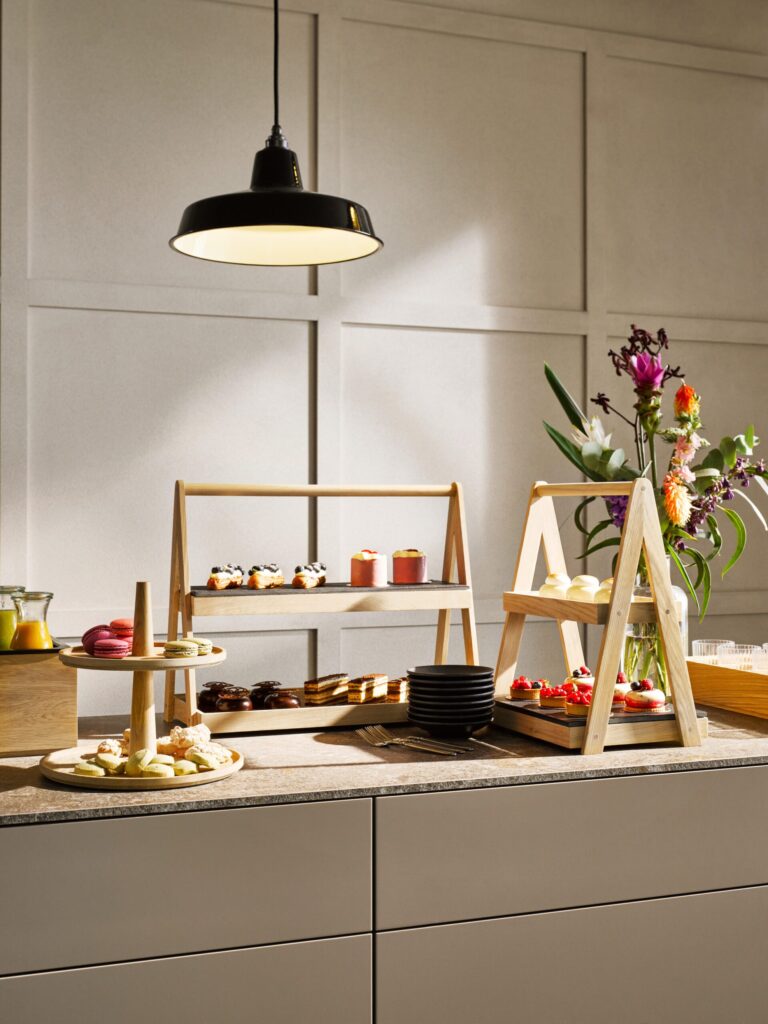
Starting a buffet isn’t an easy feat. There is so much to consider like the painstaking decision of theme and serveware as well as the design of your unique table display . Trust us, we’ve seen so many buffets and the ones that are the most successful all share a winning formula which we share below.
Find Might in Height
Dynamic presentation is what will transform your buffet table from good to great. Just like with normal table settings, you can create unique centrepieces by using varying height as your guiding principle. Not only does this make your display more appealing to the eye by adding dimension but it also allows you to creatively work with space, clearing up clutter by adding tiered display stands.
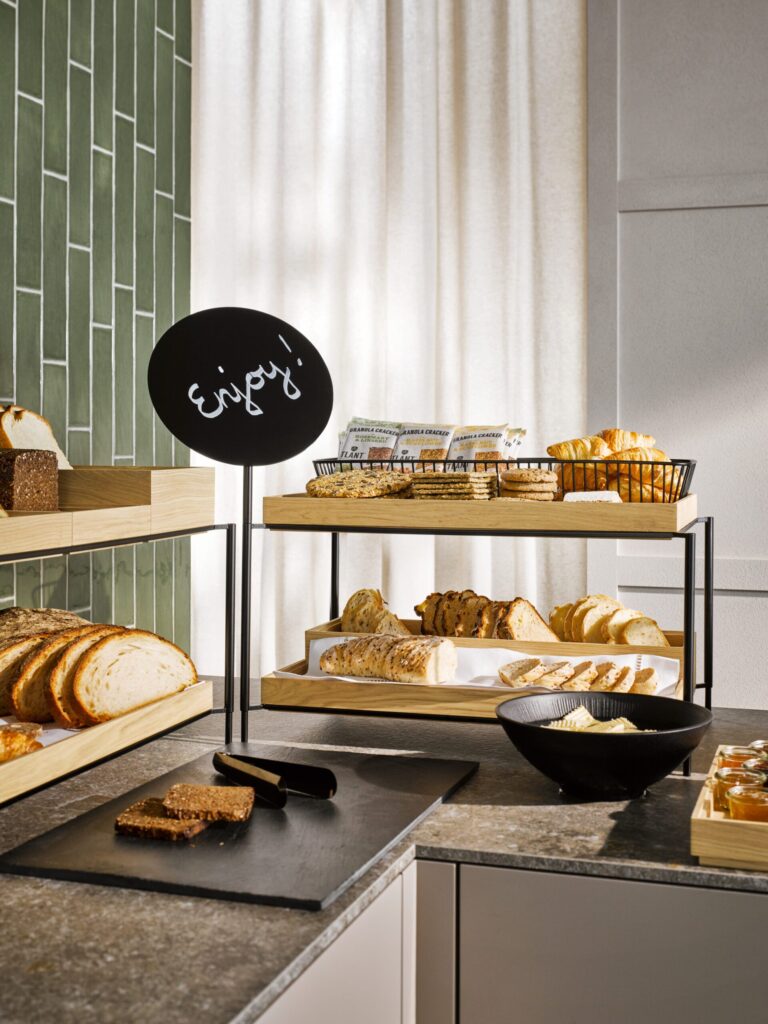
You Name It!
Note holders on a buffet offer several practical benefits. They serve as a convenient way for guests to identify dishes and ingredients, especially in larger spreads. This can be particularly helpful for dietary preferences or restrictions. Note holders also enhance the overall presentation of the buffet, adding a touch of elegance and organization. By keeping the buffet area tidy and allowing easy access to information, they ensure a smoother dining experience. Additionally, they help in maintaining a neat and professional look, making the event feel more polished and thoughtfully prepared.
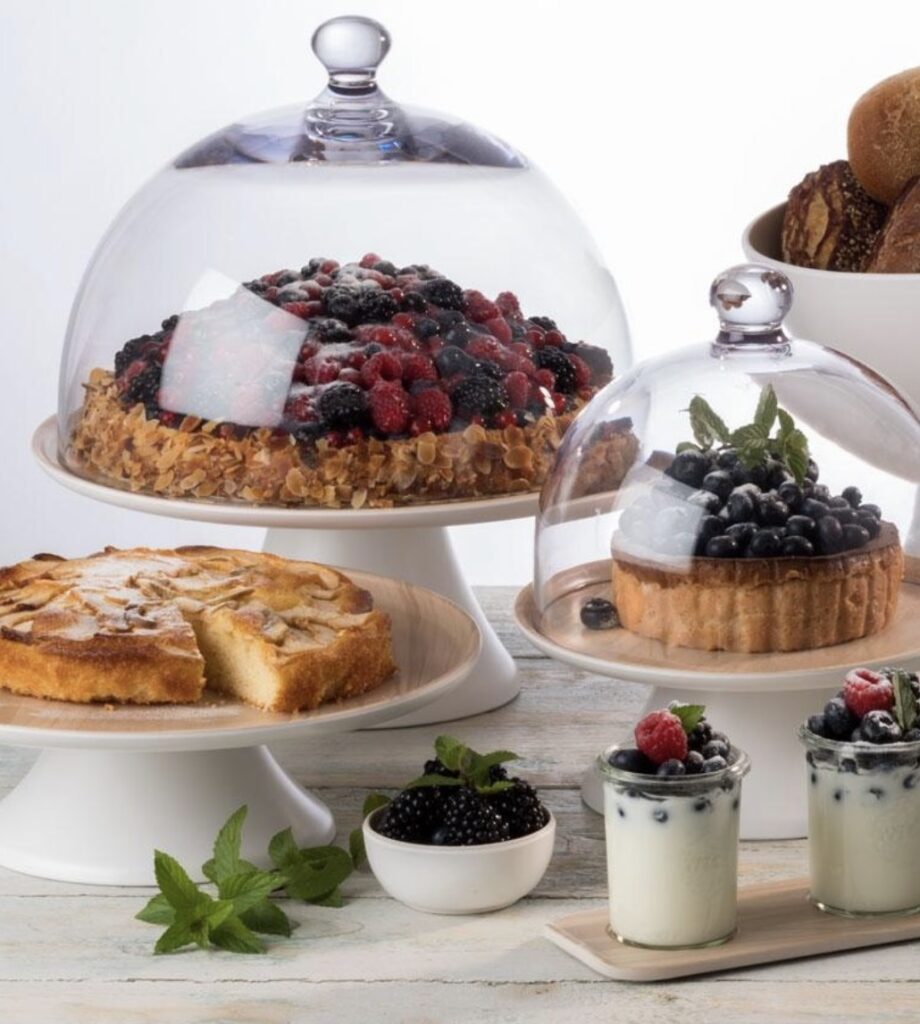
Keep it Hygienic
A buffet dome offers several practical benefits for both hosts and guests. The domes helps preserve food’s freshness by protecting it from dust, insects, and contamination. In addition, buffet domes create an organized and visually appealing presentation, allowing guests to easily serve themselves without disrupting the flow of the event. For hosts, buffet domes reduce the frequency of food replenishment, ensuring a smoother and more efficient gathering. Core Catering Supplies domes are made from durable, easy-to-clean materials, making them both a practical and hygienic choice. Overall, a buffet dome enhances convenience, aesthetics, and food safety, making it an essential tool.
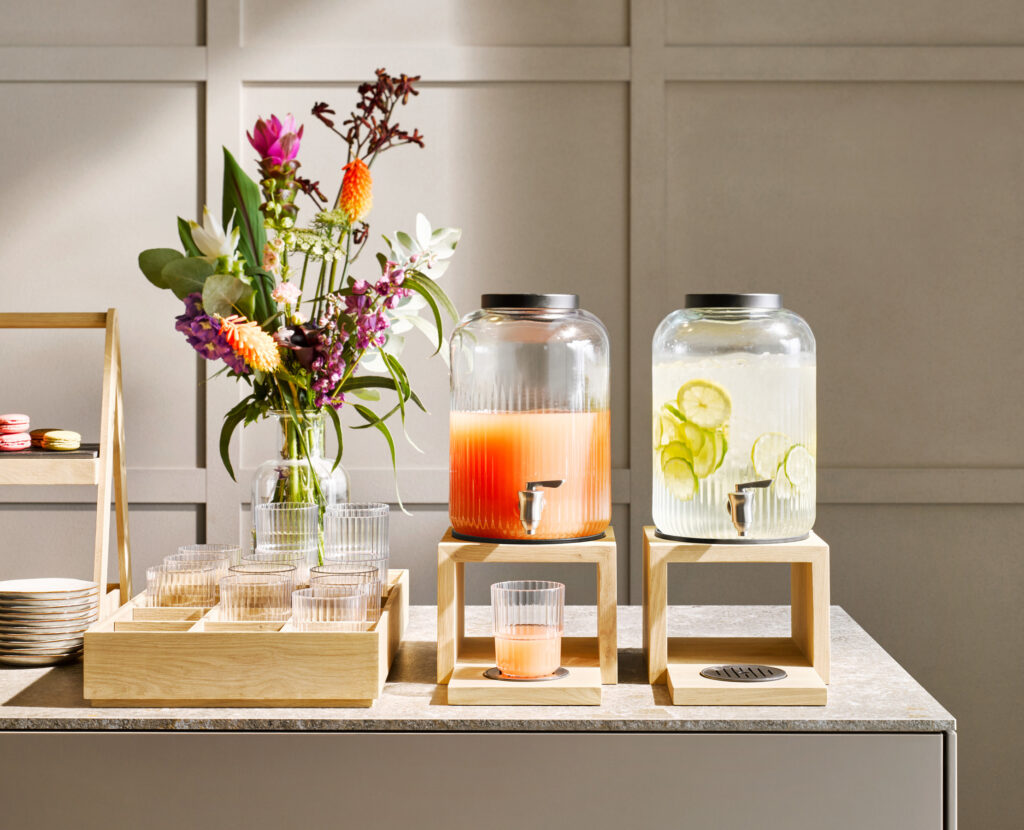
Water it Down
Drink Dispensers create a clean and organized presentation, enhancing the buffet’s overall aesthetic. Add in some fruits and herbs for flavour and extra aesthetic appeal. These dispensers are commonly used for juices, iced tea, or water, offering a convenient and hygienic way to serve drinks.
Is there a better way to start the day than with sunny orange rolls? We don’t think so either.
This recipe features tender, buttery spiral rolls with a hint of cinnamon and a perfectly gooey sweet orange marmalade centre. It looks quite complicated to make but if you follow our instructions you will need only 25 minutes hand time to create this decadent dish.
Ingredients
Orange Rolls
1 cup warm milk
1 (1/4-ounce) package active dry yeast
1 cup sugar
4 cups all-purpose flour
1/4 cup + 1/3 cup butter, melted
1 teaspoon table salt
1 teaspoon orange zest
2 large eggs, lightly beaten
Vegetable cooking spray
2/3 cup orange marmalade
3/4 tablespoon ground cinnamon
Glaze
1 cup powdered sugar
2 tablespoons butter, melted
1 1/2 tablespoons milk
1/4 teaspoon orange extract
Directions
Gather your ingredients and bloom the yeast:
Combine the milk, yeast, and 1 teaspoon of the sugar in a 1-cup glass measuring cup, stirring to dissolve yeast; let stand 5 minutes.
Prepare the dough: Combine the flour, 1/4 cup of the butter, salt, orange zest, eggs, and 3 tablespoons plus 2 teaspoons sugar in bowl of heavy-duty electric stand mixer.
Add the milk mixture; beat at low speed 1 to 2 minutes or until blended, using the dough hook attachment. Increase speed to medium-low and beat 5 minutes or until the dough is smooth (dough will be soft and slightly sticky).
Place the dough in a greased bowl; lightly greased top of dough with cooking spray.
Cover and let rise in a warm place, free from drafts, 45 minutes to 1 hour or until doubled in bulk.
Prepare filling: Combine the marmalade, remaining 1/3 cup butter, cinnamon, and remaining 3/4 cup sugar in a small bowl.
Shape the rolls: Punch the dough down. Turn out a light floured surface; roll into a rectangle.
Spread the marmalade mixture over the dough, leaving a border.
Roll up, jelly-roll fashion, starting at 1 long side.
Cut the dough into 15 slices.
Place in a well-greased a pan with sides touching.
Cover and let rise 45 minutes or until almost doubled in bulk.
While rolls bake, prepare glaze: Whisk together until blended 1 cup powdered sugar, 2 tablespoons melted butter, 1 1/2 tablespoons milk, and ¼ teaspoon orange extract. Makes 2/3 cup.
Preheat the oven to 180 degrees. Uncover the rolls, and bake 20 to 25 minutes or until light golden brown.
Remove from the oven, and cool slightly. Drizzle the glaze over the warm rolls.
How are you going to keep your kids busy without them zombifying in front of their screens? Don’t fear, here at Core Catering Supplies we have come up with the perfect solution – cooking!
Learn more about these benefits and how to get your kids inspired below. We’re also sharing our favourite fun and easy kid’s recipes you and your children will love to try together so stick around, grab your aprons and get started!
Benefits Of Getting Your Kids Involved In
Cooking
Cooking is actually a multi-disciplinary skill that draws from a wide range of faculties like mathematics fine motor movement, thinking and reasoning – all of which are important for the healthy development of your child’s mental and physical capabilities. The benefits are far-reaching and essential for adult life.
More-ish Mathematics
With schools closed, what better way to introduce arithmetic than with measuring out ingredients or adapting recipes. Kids who struggle with the abstract element of mathematics really stand to benefit from the real-world application of fractions, ratios and divisions commonly used in cooking. Teach your kids how to bake some of their favourite snacks and they won’t even realise they’re using math because of the delicious treats waiting for them at the end.
Thinking And Reasoning
Hands-on cooking activities help children develop confidence and skill. Following recipes encourages children to be self-directed and independent, and it also teaches them to follow directions and develops their problem-solving skills.
Easy Recipes For You And Your Kids
Looking for a place to start? No worries Core
Catering Supplies has got you covered with this fine selection of simple
recipes both you and your little chef will be begging to try out.
Peanutbutter And Chocolate Chip Cookies
375ml cake flour
5ml bicarbonate of soda
1ml salt
125g butter
250ml light brown sugar
1 extra-large egg
5ml vanilla essence
250ml smooth peanut butter
250ml coarsely chopped peanuts
275g milk chocolate, broken into pieces
Directions
Cream together the butter and sugar until its light and fluffy. Beat in the egg and vanilla essence, then add the peanut butter and mix well. Next, add the dry ingredients and peanuts and mix. Wrap the dough in clingfilm and chill for 2 hours.
Preheat an oven to 180°C and line two baking sheets with baking paper and grease. Break off about 30ml of the dough, roll it into a ball, press a piece of chocolate in its centre and cover with dough. Repeat with all the dough.
Arrange the dough on the baking sheet with enough space to allow for the cookies’ spread. Bake for about 16 to 18 minutes or until golden brown. Cool and serve.
Candy Miellies (Yes really!)
1 stick butter, softened
1/2 cup granulated sugar
1 tsp. pure vanilla extract
1 cup almond flour
1/4 tsp. kosher salt
6 Miellies
Directions
In a large bowl using a hand mixer, beat butter and sugar together, then add vanilla. Add almond flour and salt and beat until combined. Divide dough into 4 equal pieces. On plastic wrap, form each piece into a log. Refrigerate until solid, 2 hours.
When cookie dough is well chilled, push corn into cookie dough in rows. Refrigerate until ready to serve, at least 1 hour.
Put each pizza base on a baking sheet and spread each with half of the passata. Arrange the tomatoes on the top in rings or wedges of colour, and add the broccoli and olives. Dot the pizza with the mozzarella balls then drizzle 1 tbsp pesto over each.
Bake for 15-20mins or until the top is bubbling and just starting to brown. Scatter over the fresh basil leaves before serving.
Earth Cookies
1 bag sugar cookie mix
1 stick butter, softened
Blue food colouring
Green food colouring
Directions
Preheat oven to 375º and line two baking sheets with parchment. Prepare sugar cookie mix according to package directions. Place about 1/4 of dough in one bowl and dye green using green food coloring until desired color is reached. Dye remaining dough blue until desired color is reached.
Pull out pieces from each colour and start shaping into a ball, patching if necessary to create an Earth effect.
Place cookie dough onto prepared baking sheets and bake 8 to 9 minutes, or until edges are set (try to prevent browning).
Homemade Cake Pops
175g butter
100g caster sugar
½ tsp vanilla extract
2 eggs
100g self-raising flour
150g icing sugar
½ tsp vanilla extract
1 tbsp milk
200g white chocolate, melted, to dip
sprinkles, to dip
Directions
Preheat an oven to 190°C and prepare a 20cm cake tin by greasing and lining its base. Place 100g butter, the caster sugar and vanilla extract into a bowl and beat well to a creamy consistency. Slowly beat the eggs in, one by one, then fold in the flour and mix well. Pour into the cake tin and bake for about 20mins until risen and golden brown. Set aside to cool.
Prepare the buttercream by beating the remaining butter and icing sugar together in a mixing bowl then add the vanilla extract and milk, and beat again.
Once the cake is cooled, crumble it into large crumbs and stir in the buttercream. Take chunks of the cake mixture, roll them into balls, push a lollipop stick into each and transfer to a lined tray or plate. Refiregate for an hour.
Melt the chocolate using a microwave. Dip the individual balls into the melted chocolate and sprinkles. Refigerate 20mins before serving.
The best part of making your own smoothies is having control over what you’re putting into your blender (and your body!). Be creative with your smoothies and try these industry insider tips:
Steam your veggies. This helps break down fiber even more, making them easier on digestion. You can steam them in advance and then freeze them if you prefer frozen smoothies.
Add in moderate portions of frozen fruit. Berries are a great choice, and tropical fruits like pineapple can create a sweet treat! Consider glycemic loads when choosing your fruit. Also think about trying to include fruits like bananas, mangoes, pears, and papayas which all have soluble fiber and help make a smoothie creamy, even without dairy.
Don’t forget the fat. Increase satiety and nutrient absorption by adding fat to your smoothie. Avocados and coconut milk add creaminess while nut butters and hemp hearts add a slightly sweet, nutty taste.
Avoid sweeteners (including in your nut milk). It’s popular to add stevia, honey, or maple syrup to smoothies but they’re usually unnecessary and may spike your blood sugar. Replace sweeteners with low-glycemic fruits.
Have fun with toppings! Toppings for smoothie bowls (or mixed into your smoothie!) are fun and help you chew your smoothie. Sprinkle smoothies with fresh berries, coconut flakes, slivered almonds, or granola.
Consider add-in items. Make your smoothie a full meal by adding in protein powder or collagen protein. Turn up the fun factor by mixing in adaptogenic herbs, supplements, or trendy items like bee pollen.
We use cookies to ensure that we give you the best experience on our website. If you continue to use this site we will assume that you are happy with it.


:max_bytes(150000):strip_icc()/Orange-Rolls_Step00_Audit7024_3386-346a2b1965154e2eb3e160592dcca62d.jpg)
:max_bytes(150000):strip_icc()/Orange-Rolls_Step01_Audit7024_3389-d55d11ac1a7d4cd8b3afa11e4ec3f085.jpg)
:max_bytes(150000):strip_icc()/Orange-Rolls_Step02_Audit7024_3387-e6cfe4490b6948bfa823f3f255c7331b.jpg)
:max_bytes(150000):strip_icc()/Orange-Rolls_Step03_Audit7024_3390-13d700171a3f48689f61f77797095961.jpg)
:max_bytes(150000):strip_icc()/Orange-Rolls_Step04_Audit7024_3391-af04a75e644145d0bad4ac49431ff11b.jpg)
:max_bytes(150000):strip_icc()/Orange-Rolls_Step06_Audit7024_3393-30ded9446f1c4ccb862973a0ec6da4af.jpg)
:max_bytes(150000):strip_icc()/Orange-Rolls_Step07_Audit7024_3403-335ace89412c4bb59588d474356d8aa7.jpg)
:max_bytes(150000):strip_icc()/Orange-Rolls_Step09_Audit7024_3410-872e43a908e749109d456c462c6ed971.jpg)
:max_bytes(150000):strip_icc()/Orange-Rolls_Step09_Audit7024_3412-3e1cea513c4749f18997ea6667b01a7d.jpg)
:max_bytes(150000):strip_icc()/Orange-Rolls_Step10_Audit7024_3414-04e4aa4fc8ea44ca9ca7e1f508350d8d.jpg)
:max_bytes(150000):strip_icc()/Orange-Rolls_Step10_2-Audit7024_3415-933dd78c545241968f4fcc67ad998d45.jpg)
:max_bytes(150000):strip_icc()/Orange-Rolls_Step11-Audit7024_3501-f4167a49cc814a60987fd1775af8b3af.jpg)
:max_bytes(150000):strip_icc()/Orange-Rolls_Step12-Audit7024_3502-8f43d3f10a4340239d9b46531c688c24.jpg)
:max_bytes(150000):strip_icc()/Orange-Rolls-Step13-Audit7024_3557-abc53ac98ddd4a6d88f72f87c7e6ff49.jpg)
:max_bytes(150000):strip_icc()/Orange-Rolls-Step14-Audit7024_3563-ce8085419cad4a37aa8cbfb4815f1845.jpg)
:max_bytes(150000):strip_icc()/Orange-Rolls-Beauty2-Audit7024_3623-19e9c3f292ec48c582df3bd09ce3d892.jpg)


